Christmas tree skirt tutorial
It was 102 degrees yesterday, the air conditioning was cranked, and I got too much sun at the pool. Christmas is pretty much the last thing that should be on my mind, right? Except that somehow, December 25 always manages to sneak up on me. And with the inevitable gift buying/making rush, Christmas decor projects tend to take a back seat. Every year since I started sewing, I've been saying I would make a Christmas tree skirt for my family, and this year, we will finally have one.
Here's how to make my tree skirt, using half-rectangle tutorials by Katie of Swim Bike Quilt to make the diamonds.
You will need:-
• 1.5 yards solid white (or other background fabric)
• 3/4 yard of red prints or scraps
• 3/4 yard green prints or scraps
• about two yards of fabric for the back
• 3/4 yard of solid red for binding
Cutting:
• Cut (18) 5" x 7" rectangles from green prints
• Cut (18) 5" x 7" rectangles from red prints
• Cut (36) 5" x 7" rectangles from solid white
• Cut (4) 8.5" x 12.5" rectangles from solid white
• Cut (4) 8.5" x 6.5" rectangles from solid white
How to make it:
1. Start by going to Katie’s series of posts on making half-square rectangles (click here to see the series). For this tree skirt, you'll want 24 red half-square rectangles going in one direction, and 12 red half-square rectangles going in the opposite direction. For green, you'll want to swap that—so you need 24 green half-square rectangles going in the opposite direction of the 24 reds, and 12 greens going in the opposite direction of the 12 reds. Clear as mud? Great. Moving on. : )
2. So you should now have a total of 72 finished half-square rectangles. Now take 4 of those half-square rectangle units and sew them together to create a diamond shape, as shown below.
3. Lay out your completed diamond blocks as shown above. The first three rows are staggered, followed by a row that isn't staggered, followed by two more staggered rows. The 8.5" x 12.5" white pieces go in each corner, and the 8.5" x 6.5" pieces are in the second row in from each side, at the top and bottom.
4. Once I completed the top, I decided to baste the skirt before trimming it into an octagon shape. (I figured it would be easier to baste while the skirt was still square, but I didn't want to spend time quilting areas that would eventually be trimmed off. So trimming after basting but before quilting was my solution—but you could really trim at any point in the process.) To create the octagon, measure along the edges of the basted skirt, 16.25" from each corner, and make a mark.
5. Then lay your ruler diagonally across the corner, from mark to mark, and trim. Voila, it's an octagon! Oh, and save the corner pieces that you cut off—they're great for practicing your FMQ!
6. Now you're ready to quilt. Since this was the first project I quilted on my new Horizon, I wanted to try a free-motion design that I'd never done before—and since I've never done anything but stippling, I had lots of options. : ) I went with loopy squiggles.
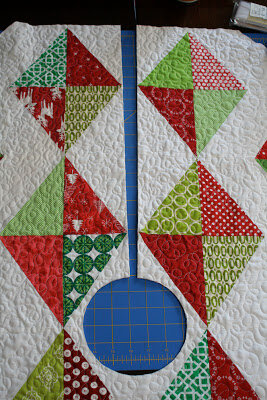
7. Now comes the scary part: Cutting into an almost-completed quilt to make space for the tree trunk! I used a cereal bowl to trace a circle in the dead-center of my skirt (dead center is easy to find thanks to the block seams).
8. Once the circle was traced, I used a ruler and my rotary cutter to cut right down the center seam of the quilt, starting at the top edge and stopping once you've cut into the traced circle.
9. Then I used my scissors to cut out the center hole.
Looks more like a tree skirt now, right?
10. That just leaves binding. With the octagon's odd angles and the circular hole in the center, bias binding is a must here. I always make continuous binding when I use bias—click here for a great tutorial on how to do this from Julie of Jaybird Quilts (scroll down to Method #2). It's a convenient way to make bias binding, and results in less waste. I made my binding from a 27" square and had plenty left over.
11. To bind around the odd angles of the octagon, I used this tutorial by Heather Mulder Peterson of Anka's Treasures. It's more or less the same concept as binding 90-degree corners. Once you've gone around the octagon, keep going down one of the long cut edges, around the inner circle and back up the other cut edge, right back to where you started, like a normal square quilt.

And there you have it! One bright, modern Christmas tree skirt, and I already have one less thing on my holiday to-do list! Woo hoo!
Don't forget to check out the rest of the blog hop—the full schedule is below. Now, off to the pool! : )
Monday 7/16 - Don't Call Me Betsy
Tuesday 7/17 - Sew Crafty Jess
Wednesday 7/18 - Pink Penguin
Thursday 7/19 - Freshly Pieced
Friday 7/20 - Sew Sweetness
Monday 7/23 - Happy Quilting
Tuesday 7/24 - Comfort Stitching
Wednesday 7/25 - Diary of a Quilter
Thursday 7/26 - Felicity Quilts


