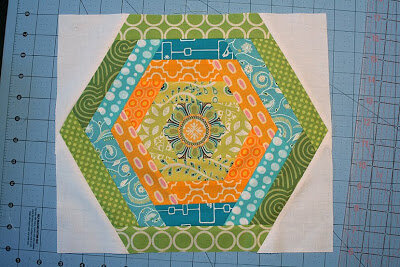
Hexagon block pattern
Um, blogging break? What blogging break? Of course, I said I'm taking a blogging break, and now here I am posting a full-fledged block tutorial. You knew I couldn't stay away, didn't you?
But June is my month as quilter for the Love Circle of Do. Good Stitches, and I changed my plan for the quilt at the last minute, and the new plan requires a block tutorial ... and here we are. This 12.5" square log-cabin-style hexagon block is fun and easy to piece. Enjoy, whether you are in the Love Circle or not.
1. First, download my template for the center hexagon here. Download the template to your device before printing (printing directly from the web can sometimes result in an inaccurate size). When printing, be sure to print it at “Actual size” or “100% size,” or click “no scaling.” When printed at actual size, the hexagon should be 2.75" high (from flat edge to flat edge).
2. Use the template to cut out a hexagon for the center of your block. The template includes seam allowance, so no need to add for that.
3. Now cut 1.5" wide strips for each side of your center hexie. Sew two of the strips onto opposite sides of your hexie, as shown. Press seams open.
4. Use the 60-degree angle mark on your ruler to trim the ends of the pieces you just added. Line up the 60-degree angle line with the seam opposite the strip you're trimming.
5. When you're done trimming the ends, you should have a unit that looks like this.
6. Add two more strips to opposite edges of the center hexagon.
7. Trim the ends of these strips by matching up the 1.25" vertical line on your ruler with the seam that runs parallel to the edge you want to trim, and the 60-degree angle mark should line up with the raw edge of the unit, as shown.
8. When you're done trimming, it should look like this.
9. Add your final two strips to opposite sides of the hexagon.
10. Again, trim the ends of the strips in the same way you did the previous two strips. Line up 1.25" mark with a parallel seam, and the 60-degree line with a raw edge of the block.
11. Now your hexagon should look like this, with one complete round of "logs."
12. Cut another set of 1.5" strips and follow the steps above to sew another round of logs around your hexagon, in the same manner as the first.
13. Continue adding logs to make two more rounds. Your completed hexagon should be no more than 12.5" wide, from point to point. If it's more than 12.5", go ahead and trim around the outer edge to bring it down to size. If it's a little less than 12.5" wide, that's okay.
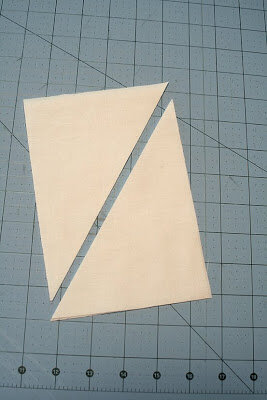
14. From your background fabric (I'm using solid white), cut two 5" x 7" rectangles. Now cut a diagonal line through each rectangle, like so.
15. Sew the background triangles onto the corners of your hexagon, as shown. The triangles will be larger than what you need, but I found it easier to make them too big and then trim down to nice 90-degree corners. Add triangles to all four corners.
16. Trim your block so that it measures 12.5" wide by 11" high. (There should be at least .25" of white background at its narrowest point along each side of the block.)
17. Add 1.5" strips to the top and bottom of your block and trim to 12.5" square.
Thank you, ladies of the Love Circle! Now I'm going back into hiding until Thursday as planned, but I will be reachable by email if you have questions or problems with the block. Have a great holiday.
P.S. In case you're dying for an update on the potty training ... well, it's going. That's about the best I can say at this point. 😂


